Advanced Usage#
This page describes some advanced features of pyinaturalist.
Pagination#
Most endpoints support pagination, using the parameters:
page: Page number to getper_page: Number of results to get per pagecount_only=True: This is just a shortcut forper_page=0, which will return only the total number of results, not the results themselves.
The default and maximum per_page values vary by endpoint, but it’s 200 for most endpoints.
To get all pages of results and combine them into a single response, use page='all'.
Note that this replaces the get_all_*() functions from pyinaturalist<=0.12.
Authentication#
For any endpoints that create, update, or delete data, you will need to authenticate using an OAuth2 access token. This requires both your iNaturalist username and password, and separate “application” credentials.
Note
Read-only requests generally don’t require authentication; however, if you want to access private data visible only to your user (for example, obscured or private coordinates), you will need to use an access token.
Summary:
Create an iNaturalist application
Use
get_access_token()with your user + application credentials to get an access tokenPass that access token to any API request function that uses it
Creating an Application#
Why do I need to create an application?
iNaturalist uses OAuth2, which provides several different methods (or “flows”) to access the site. For example, on the login page, you have the option of logging in with a username/password, or with an external provider (Google, Facebook, etc.):

Outside of iNaturalist.org, anything else that uses the API to create or modify data is considered an “application,” even if you’re just running some scripts on your own computer.
See iNaturalist documentation for more details on authentication.
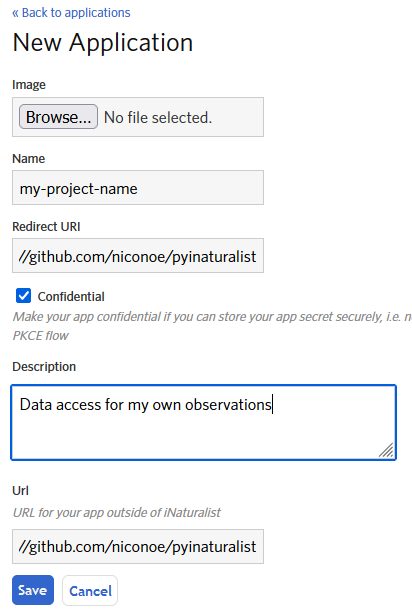
First, go to New Application and fill out the following pieces of information:
Name: Any name you want to come up with. For example, if this is associated with a GitHub repo, you can use your repo name.
Description: A brief description of what you’ll be using this for. For example, “Data access for my own observations”.
Confidential: ✔️ This should be checked.
URL and Redirect URI: Just enter the URL to your GitHub repo, if you have one; otherwise any placeholder like “https://www.inaturalist.org” will work.

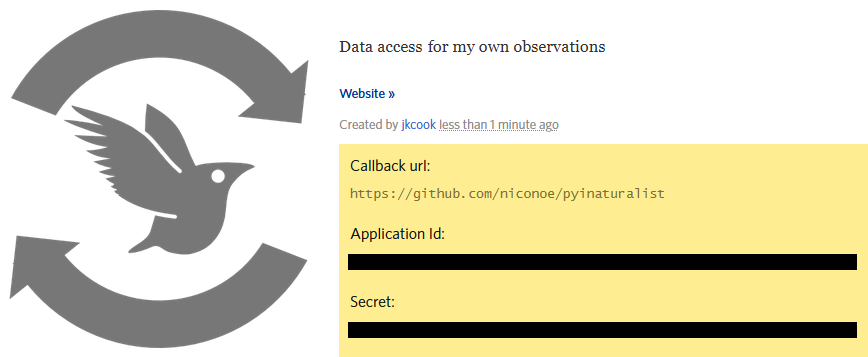
You should then see a screen like this, which will show your new application ID and secret. These will only be shown once, so save them somewhere secure, preferably in a password manager.

Basic Usage#
There are a few different ways you can pass your credentials to iNaturalist. First, you can pass
them as keyword arguments to get_access_token():
>>> from pyinaturalist import get_access_token
>>> access_token = get_access_token(
>>>     username='my_inaturalist_username',  # Username you use to login to iNaturalist.org
>>>     password='my_inaturalist_password',  # Password you use to login to iNaturalist.org
>>>     app_id='33f27dc63bdf27f4ca6cd95dd',  # OAuth2 application ID
>>>     app_secret='bbce628be722bfe2abde4',  # OAuth2 application secret
>>> )
Environment Variables#
You can also provide credentials via environment variables instead of arguments. The
environment variable names are the keyword arguments in uppercase, prefixed with INAT_:
INAT_USERNAMEINAT_PASSWORDINAT_APP_IDINAT_APP_SECRET
Examples:
>>> import os
>>> os.environ['INAT_USERNAME'] = 'my_inaturalist_username'
>>> os.environ['INAT_PASSWORD'] = 'my_inaturalist_password'
>>> os.environ['INAT_APP_ID'] = '33f27dc63bdf27f4ca6cd95df'
>>> os.environ['INAT_APP_SECRET'] = 'bbce628be722bfe283de4'
export INAT_USERNAME="my_inaturalist_username"
export INAT_PASSWORD="my_inaturalist_password"
export INAT_APP_ID="33f27dc63bdf27f4ca6cd95df"
export INAT_APP_SECRET="bbce628be722bfe283de4"
set INAT_USERNAME="my_inaturalist_username"
set INAT_PASSWORD="my_inaturalist_password"
set INAT_APP_ID="33f27dc63bdf27f4ca6cd95df"
set INAT_APP_SECRET="bbce628be722bfe283de4"
$Env:INAT_USERNAME="my_inaturalist_username"
$Env:INAT_PASSWORD="my_inaturalist_password"
$Env:INAT_APP_ID="33f27dc63bdf27f4ca6cd95df"
$Env:INAT_APP_SECRET="bbce628be722bfe283de4"
Note that in any shell, these environment variables will only be set for your current shell session. I.e., you can’t set them in one terminal and then access them in another.
Keyring Integration#
To handle your credentials more securely, you can store them in your system keyring. You could manually store and retrieve them with a utility like secret-tool and place them in environment variables as described above, but there is a much simpler option.
Direct keyring integration is provided via python keyring. Most common keyring bakcends are supported, including:
macOS Keychain
Freedesktop Secret Service
KDE KWallet
To store your credentials in the keyring, run set_keyring_credentials():
>>> from pyinaturalist.auth import set_keyring_credentials
>>> set_keyring_credentials(
>>>     username='my_inaturalist_username',
>>>     password='my_inaturalist_password',
>>>     app_id='33f27dc63bdf27f4ca6cd95df',
>>>     app_secret='bbce628be722bfe283de4',
>>> )
Afterward, you can call get_access_token() without any arguments, and your credentials
will be retrieved from the keyring. You do not need to run set_keyring_credentials()
again unless you change your iNaturalist password.
Password Manager Integration#
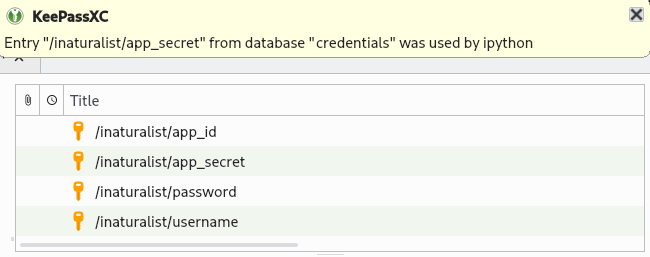
Keyring integration can be taken a step further by managing your keyring with a password manager. This has the advantage of keeping your credentials in one place that can be synced across multiple machines. KeePassXC offers this feature for macOS and Linux systems. See this guide for setup info: KeepassXC and secret service, a small walk-through.

Credentials storage with keyring + KeePassXC#
Sessions#
If you want more control over how requests are sent, you can provide your own ClientSession
object using the session argument for any API request function.
See Caching and Rate-Limiting sections below for examples.
Caching#
All API requests are cached by default. These expire in 30 minutes for most endpoints, and 1 day for some infrequently-changing data (like taxa and places). See requests-cache: Expiration for details on cache expiration behavior.
You can change this behavior using ClientSession. For example, to keep cached requests for 5 days:
>>> from datetime import timedelta
>>> from pyinaturalist import ClientSession, get_taxa
>>> session = ClientSession(expire_after=timedelta(days=5))
>>> get_taxa(q='warbler', locale=1, session=session)
To store the cache somewhere other than the default cache directory:
>>> session = ClientSession(cache_name='~/data/api_requests.db')
To manually clear the cache:
>>> session.cache.clear()
Or as a shortcut, without a session object:
from pyinaturalist import clear_cache

clear_cache()
Rate Limiting#
Rate limiting is applied to all requests so they stay within the rates specified by iNaturalist’s API Recommended Practices.
You can modify these rate limits using ClientSession.
For example, to reduce the rate to 50 requests per minute:
>>> from pyinaturalist import ClientSession, get_taxa
>>> session = ClientSession(per_minute=50)
>>> get_taxa(q='warbler', locale=1, session=session)
Distributed Application Rate Limiting#
The default rate-limiting backend is thread-safe, and persistent across application restarts. If
you have a larger application running from multiple processes, you will need an additional locking
mechanism to make sure these processes don’t conflict with each other. This is available with
pyrate_limter.FileLockSQLiteBucket, which can be passed as the session’s bucket_class:
>>> from pyinaturalist import ClientSession
>>> from pyrate_limter import FileLockSQLiteBucket
>>> session = ClientSession(bucket_class=FileLockSQLiteBucket)
This requires installing one additional dependency, py-filelock:
pip install filelock
Logging#
You can configure logging for pyinaturalist using the standard Python logging module, for example
with logging.basicConfig():
>>> import logging
>>> logging.basicConfig()
>>> logging.getLogger('pyinaturalist').setLevel('INFO')
For convenience, an enable_logging() function is included that will apply some recommended
settings, including colorized output (if viewed in a terminal) and better traceback formatting,
using the rich library.
>>> from pyinaturalist import enable_logging
>>> enable_logging()
Dry-run mode#
While developing and testing, it can be useful to temporarily mock out HTTP requests, especially requests that add, modify, or delete real data. Pyinaturalist has some settings to make this easier.
Dry-run individual requests#
All API request functions take an optional dry_run argument. When set to True, requests will not
be sent but will be logged instead.
Note
You must enable at least INFO-level logging to see the logged request info
>>> from pyinaturalist import get_taxa
>>> get_taxa(q='warbler', locale=1, dry_run=True)
{'results': [], 'total_results': 0}
[07-26 18:55:50] INFO  Request: GET https://api.inaturalist.org/v1/taxa?q=warbler&locale=1
User-Agent: pyinaturalist/0.15.0
Accept: application/json
Dry-run all requests#
To enable dry-run mode for all requests, set the DRY_RUN_ENABLED environment variable:
>>> import os
>>> os.environ['DRY_RUN_ENABLED'] = 'true'
export DRY_RUN_ENABLED=true
set DRY_RUN_ENABLED="true"
$Env:DRY_RUN_ENABLED="true"
Dry-run only write requests#
If you would like to send real GET requests but mock out any requests that modify data
(POST, PUT, and DELETE), you can use the DRY_RUN_WRITE_ONLY variable instead:
>>> import os
>>> os.environ['DRY_RUN_WRITE_ONLY'] = 'true'
export DRY_RUN_WRITE_ONLY=true
set DRY_RUN_WRITE_ONLY="true"
$Env:DRY_RUN_WRITE_ONLY="true"
User Agent#
If you’re using the API as part of a project or application, it’s good practice to add that info to the user-agent. You can optionally set this on the session object used to make requests:
>>> from pyinaturalist import ClientSession
>>> session = ClientSession(user_agent='my_app/1.0.0')